Total Pageviews

Tuesday, December 29, 2015

Prime Rib

As I arrived back in Midland from my family trip to Florida, I saw that Jack's Farmers' Market had boneless rib roasts on sale.  Since I needed something to eat for the few days in town before leaving for New Orleans, I figured what the heck.  After all, my brother, Steve, told me about the roast he made for Christmas and it sounded really good.  Now, this was my first attempt at making prime rib, so I started out doing some research.  After my debacle with the ham in the crockpot, I decided to actually roast it in the over (as it should always be done).  But there are a lot of different recipes out there and it was hard to decipher the best way to prepare it.  So, I contacted my brother and got his input.  First things first, you must do a dry brine with these cuts.  That means rubbing the meat with kosher salt and placing it, uncovered, in the refrigerator at least 2 hours (in this case, I did overnight - about 10 hours). 

Once you have it brined, you then must take it out and allow it to come to room temperature, at least 2 hours.  Now, my poor brother tried to make yorkshire puddings in between roasting and searing the roast and ended up with an oven fire, so he didn't get to sear.  But I managed to do all the steps, so here's how it works.  Oh, and did I mention that this recipe is only 3 ingredients?

Prime Rib Roast
  • 5-5 1/2 lb boneless rib roast
  • Kosher salt
  • Fresh-ground pepper
 The night before roasting, prepare a dry brine.  Rub the roast on all sides with kosher salt and place, uncovered, in refrigerator.

The next day, pull the roast out and allow to come to room temperature, at least 2 hours on the counter. 

Preheat oven to 350F.  Season roast with pepper (remember that it has already been salted).  Place on a roasting pan and roast for 1 hour.  Without opening the oven, turn off the heat.  Allow to sit for 1 hour.  Then turn oven on to 400F and set timer for 1/2 hour.  This will allow for the sear.  Once done, pull from over and place on a cutting board.  Allow to sit for 15 minutes before slicing (although, there was still a bit more blood after slicing than I like, so 30 minutes might be better).


Note: Although this picture shows close to medium-rare, it is still a bit more cooked than I prefer, so I would probably shorten the cooking time just a little.  But it was still closer to medium-rare than medium, so it was all good.

Sunday, December 6, 2015

Chicago Deep Dish Pizza!

Because our paint night was cancelled tonight, I invited my friend, Lawrence, to come over and have dinner.  He had a friend in town who had come to cheer Lawrence on in his Santa Clause race in the morning.  I met this friend a month or so ago and he's very interesting.  He works in Aeronautics.  Because he's in a science world, I find him fascinating.  So always glad to have the two of them to dinner.  And now that I have my own beautiful house, I have the space to entertain AND I have a beautiful kitchen to cook in. 

Thus, it was a very busy day of cooking and cleaning.  It started with "Christmas Crack" or Chex mix.  This would be my third batch this year and I try to only make it when I have an excuse to share.  This was followed by Magic Bars (my version this year has dark chocolate and PB chips).  Finally, to the main dish. About two months ago, I updated my pizza supplies, including individual sized deep dish pizza pans.  Seeing them on the counter made me want to try my hand at making Chicago-style deep dish pizza.  I have resisted doing this in the past because I love the crust and I am always worried that the recipes are not quite right.  There is a different texture to Chicago pizza crust and that is what I love able it.  After some searching, I found a recipe to try out.  But at the same time, I decided that I would also make my own pizza sauce for this (given that I have those beautiful home-canned tomatoes).

Well, the result was incredible.  The crust was light and crunchy, exactly what I expected.  We chose sausage and pepperoni (very traditional) and I made my own sauce which was exactly right for this pizza.  Can't wait to try it again and change up the fillings.

Chicago-style Deep Dish Pizza
Adapted from:www.bunsinbyoven.com/wp-content/uploads/2012/09/chicago-deep-dish-pizza-recipe.jpg

For crust
  •  3/4 cup lukewarm water
  • 1 1/2 tsp active dry yeast
  • 2 cups flour
  •  1/3 cup extra virgin olive oil
  • 1 tsp suger
  • 1 tsp kosher salt
  • 2 tbsp corn meal
For sauce
  • 1/2 large onion, finely diced
  • 3 cloves garlic, minced
  • 28-oz jar home-canned tomatoes
  • 2 tsp dried basil (during the spring/summer, consider using 2 Tbsp fresh basil)
Fillings
  • 1 1/2 cups part-skim mozzarella
  • 1 lb sweet Italian sausage
  • 15 slices turkey pepperoni


To make crust:
Add the water and yeast to the bowl of a stand mixer fitted with a dough hook.  Let sit 5 minutes.  Add flour, oil, sugar, salt and corn meal to the bowl and turn the mixer to low.  Mix until just combined and increase speed to medium, kneading for 2 minutes.  Place the dough ball into a large, greased bowl and set in a warm place for up to 6 hours (or until dough has doubled).  

To make the sauce:
While the dough is rising, make the sauce.  In this case, I cooked and crumbled the sausage in a large skillet.  Once cooked, remove the sausage to a plate lined with a paper towel to drain.  Remove all but 1 Tbsp of the drippings.  Add onions and cook until starting to brown.  Add garlic and cook one minute longer.  Add tomatoes and basil.  If tomatoes are whole, halved or quartered, use an immersion blender to puree until consistency of pureed tomatoes (you may use pureed tomatoes as well).  Cook for about 20 minutes to meld flavors.

To assemble pizza:
Preheat oven to 475F.  Lightly butter 3 individual-sized deep dish pizza pans (or a 12-inch cast iron skillet).  Sprinkle with additional corn meal.  Punch down the dough and let rest for 15 minutes.  Divide into three balls and place one in each prepared pan.  Use your fingers to press it into the bottom of the pans and up the sides. 

Sprinkle crust with mozzarella cheese (this keeps crust from becoming soggy).  Layer sausage and pepperoni.  Then spoon sauce over all.  Bake for 25-30 minutes or until crust is browned and the edges of the pepperoni that peek through the sauce are also browned.  Allow to set for 5 minutes before cutting.


Saturday, November 14, 2015

A Different Bean Soup

I have been craving bean soup ever since my friend, Bill LaFevre, posted that he was making split pea soup a couple weeks ago. I even thawed a ham steak thinking I would make bean with ham soup. But at the same time, I thawed the beef shanks I got with my last CSA delivery and figured I would find something to do with those as well.

Because ham keeps better than raw beef, I decided to braise the beef shanks first. I braised them in chianti and port with onions and garlic. It made my house smell heavenly and the result was quite yummy. But even better than that, the wine/port mixture I braised the meat in became this beautiful wine stock. As soon as I tasted it, I abandoned the idea of bean with ham soup and decided to use the beef and stock to make my bean soup. I was not disappointed! This will probably become one of my go-to fall soup recipes!

Braised Beef and Bean Soup

2 beef shanks** (about 3 lbs)
1/2 bottle chianti
1 cup tawny port
1 lg sweet onion
3 cloves garlic
1 Tbsp Magique herbs***
1 Tbsp Olive oil
3 cups fresh "dried" navy beans*
32 oz beef stock
3 carrots
Water as needed
Salt and pepper, to taste.

Directions
Braising beef

Combine chianti, port and herbs in a zipped bag. And beef shanks and turn to coat. Seal bag and marinate in the refrigerator for up to 24 hours.

In a large skillet, heat olive oil over medium-high heat. Sear beef shanks on both sides, about 3 minutes.

Slice onion thin and place in crockpot with garlic. Place beef shanks on top. Pour marinade over beef and cook, on HIGH, for 1 hour. Once the liquid is boiling, reduce heat to LOW and braise 6-8 hours.

When meat has pulled away from the bones, remove shanks and vegetables to a plate. Allow to cool enough to handle and pull as much of the fat, plus bones, from the meat. Chop the rest.

Cool the remaining stock until fat sets. Remove the fat.

Assembling the soup

In a large Dutch oven, combine beef, wine stock, beef stock carrots, beef stock and beans.  Bring to a boil. Cover and reduce heat to simmer. Cook, covered, for about 2 hours, adding water ad needed, until beans are cooked. Adjust seasonings.

*farmers market ingredients
**CSA ingredients
***fleur de sel aux herbes de provence

Sunday, November 8, 2015

Jack's Bacon

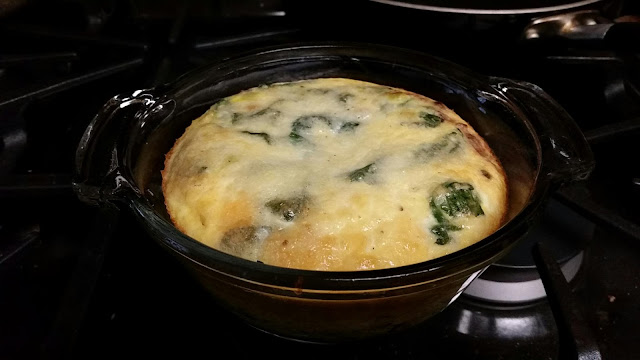
Every once in a while, I stop by Jack's Market to get bacon and sausage. They have the best thick - cut bacon. I also had leeks and spinach that I needed to use. I figured that would be a great combination for a quiche.

Bacon Spinach Quiche with Leeks

2 slices thick - cut bacon
1 med leek*
3 cups baby spinach, stems removed
2 cloves garlic, minced
4 eggs**
1 cup milk
Salt and pepper
1 cup Swiss cheese

Preheat oven to 350F.  Cook bacon over medium heat until crisp. Transfer to paper towels to drain. When cool, chop into small pieces. Pour off all but 1 Tbsp bacon grease. Cut white part of leek in half lengthwise and then slice into 1/4 - inch slices. Heat pan and add leeks. Cook about 2 minutes. Add spinach and cook until just wilted. Add garlic and cook one more minute. Remove to paper towel to drain excess moisture.

Prepare baking dish with cooking spray. Place vegetables and bacon into bottom of dish. In a large mixing bowl, beat eggs with salt and pepper. Slowly add milk until well mixed. Pour over vegetables. Sprinkle with swiss cheese.  Bake for 35-40 minutes or until a knife, inserted into center, comes out clean. Allow to set 5 minutes before serving.

*farmers market ingredients
**CSA ingredients

Saturday, October 3, 2015

Chicken Chili

A couple weeks ago at the farmers market, I bought a couple pounds of fresh navy beans.  Something that I discovered being a member of a CSA, was that fresh "dried" beans are so much better than beans from the grocery store!!!!  You don't even have to soak them.  I even talked mom into buying some.  Since I went to Sam's Club the other day, I had purchased a rotisserie chicken ($4.99 for a very large bird!).  So, this morning, I decided to make white chicken chili.  Of course, it helps if you check to make sure you have all the ingredients!  But when I looked in my cupboard, I didn't have green chiles.  So, I looked in my pantry and found a jar of medium hot Hungarian peppers (also from my CSA).  I've actually had them set aside because I wasn't sure what I wanted to do with them.  I figured they would be a good substitute.  Well, it only took an hour of simmering for the beans to cook and the peppers were better than green chiles!

White Chicken Chili
  • 1 lb fresh "dried" navy beans*
  • 6 cups chicken stock
  • 2 Tbsp extra virgin olive oil
  • 1 medium sweet onion*
  • 4 medium hot Hungarian peppers**
  • 1 Tbsp minced garlic
  • 3 cups shredded chicken breast
  • 1 1/2 Tbsp ground cumin
  • 1 Tbsp dried oregano
  • Salt & Pepper, to taste
 Rinse the beans and sort.  Place in a large Dutch oven and add chicken stock.  Bring to a boil; then reduce heat to a simmer.  Cover and cook.  While beans are cooking, chop onions and peppers.  Heat olive oil in large skillet; add onions and saute until they become translucent.  Add the peppers, garlic and chickens and heat through.  Add these to the soup.  Add seasonings.  Bring to a boil; cover and simmer for 1 1/2 hours, or until beans are cooked.  Add water as necessary.


*Farmers market ingredients
**CSA ingredients 

Thursday, October 1, 2015

Stuffed Eggplant

I had puchased a couple small eggplant at the farmers market last week and needed to use them. In light of the fact that I had also made ragu last week, I thought this would be a good time to try my hand at stuffed eggplant. After hollow in out the eggplant halves, I combined the ragu and eggplant flesh with panko and cheese and stuffed the mixture into the shells. After baking, I ended up with something quite yummy!  I think next time I would include some sweet peppers. But this was quite tasty.

Stuffed peppers
Preheat oven to 350F. Hollow out eggplants and chop removed flesh. Microwave the eggplant with 1/4 Cup water for 5 minutes on HIGH.  Heat ragu, add cooked eggplant, panko and cheese; mix well. Spoon mixture into the eggplant shells. Cover with provolone slices. Bake 45 -50 minute, or until eggplant is cooked and cheese is melted and golden brown.


*farmers market ingredients

Saturday, September 26, 2015

Home Canned Tomatoes

So, last week, I canned tomatoes for the first time in probably 2 decades.  I tried to can 6 quarts.  Five worked beautifully and one failed spectacularly.  So, this week, I needed to use that quart.  I decided that since I have a really nice looking spaghetti squash, I would make a ragu.  This one with sausage and cannellini beans.  I started it in a skillet and then transferred it to my crockpot to cook while I was out shopping with John.  Love having things like this cooking in the crockpot because it makes the house smell heavenly!

Sausage, White Bean and Tomato Ragu
  • 12 oz sweet Italian sausage**
  • 1 large onion*, diced
  • 1 Tbsp olive oil
  • 2 Tbsp tomato paste
  • 3 cloves roasted garlic, minced
  • 1 cup chianti
  • 3/4 cup chicken stock
  • 1 quart tomatoes*, undrained
  • 2 (15-oz) cans cannellini beans, drained & rinsed
  • 1 Tbsp dried Italian seasoning
  • Salt & Pepper, to taste
Heat a large skillet over medium-high heat.  Add sausage and cook, breaking up, for about 3 minutes.  Remove sausage from skillet and set aside.  Add olive oil to pan and then saute onions about 3 minutes.  Add tomato paste and garlic; cook for about 1 minute.  Add wine to pan to deglaze; make sure to scrape the brown bits from the pan.  Add the rest of the ingredients.  Pour all into a crockpot and cook, covered, on LOW for 4-5 hours.  Then open lid and allow to cook for 2 more hours to thicken.  Serve over pasta, rice or spaghetti squash.


*Farmers market ingredients
**CSA ingredients

Monday, September 21, 2015

Brussels Gratin

I hate when the farmers market starts reminding me that summer is almost over (in reality).  While at the farmers market this weekend, I found some brussels sprouts, but they are starting to get bigger than I prefer.  I chose a pint that had smaller heads, but there were a few that were quite a bit bigger than I usually settle for.  But today, I decided I had better cook them because they are older and probably won't keep as long.  As I usually do, I got on Pinterest to get some ideas and saw recipes for Brussels sprouts gratin.  After reading a few of them, I decide to try my hand at coming up with a recipe since I had about 1/3 the amount of sprouts that any of the recipes called for.  I figured if I could make a proper sauce, it would be okay because I also had some small baking dishes that I could split them into.  But you can use a bigger baking pan and it will work just as well.  Here's what I did:

Brussels Sprouts Gratin
  • 2/3 pound fresh Brussels sprouts*
  • 2 Tbsp butter
  • 2 Tbsp flour
  • 1 1/4 cup milk
  • salt & pepper, to taste
  • 1 1/2 cups Swiss cheese, divided
  • 1/2 cup Panko bread crumbs
  • 1 Tbsp butter
Preheat oven to 350F.

Wash Brussels sprouts; dry.  Cut bases of sprouts and remove the loose outer leaves.  Cut in half or in quarters (depending on size).  Place in a microwave safe bowl with 1/4 cup water.  Cook on HIGH for 7 minutes, or until sprouts are just beginning to cook.  Drain and set aside.

In a skillet, melt butter.  Add flour and whisk, cooking for about 2 minutes.  Slowly add milk, whisking the whole time to prevent lumps.  Cook until thickened, about 4 minutes.  Remove from heat and season with salt and pepper and add 1 cup cheese, stirring until cheese is melted.

Place sprouts into a prepared baking dish.  Spoon sauce over the sprouts.  Then sprinkle with remaining cheese and Panko bread crumbs.  Dot with butter.  Bake, covered, for 20 minutes, until sauce begins to bubble.  Remove cover, change oven to broiler, broil for about 5 minutes or until bread crumbs are golden brown.


*Farmers market ingredients

Saturday, September 5, 2015

Okra

Decided I needed to use up some of the okra I got last weekend at the farmers market.  So, as I was digging through recipes (I only wanted to use a bit of them because I still plan to make okra and tomatoes), I ran across an idea for mini crustless frittatas.  Well, I made them this morning and they were actually quite nice!  Might have to think about changing my quiches into mini quiches for grab-and-go ease.

Mini Okra Frittatas
Adapted from: http://arentedkitchen.com/2012/09/24/mini-okra-frittata-cups/
  • 1 cup sliced okra*
  • 1 Tbsp extra virgin olive oil
  • 2 cloves garlic, minced
  • 6 slices cooked bacon, diced
  • 6 large eggs**
  • 1/2 cup 1/2% milk
  • 1/2 cup panko crumbs
  • 1/4 tsp fresh ground black pepper
  • 1/2 tsp dried oregano
  • salt & pepper, to taste
  • 1/4 cup grated parmesan
  • 1/2 cup Mexican blend cheese
 Preheat oven to 375 degrees.  Prepare 2 mini-muffin pans.  

Heat oil over medium-high heat.  Add okra and saute for about 5 minutes until browned and crispy.  Add minced garlic and continue cooking until fragrant.  Remove from heat. 

In a medium bowl, beat eggs with milk, panko and seasonings until smooth.  Add the okra, bacon and cheese.  Fill muffin cups to top and bake, about 12 minutes, until the frittatas are puffed and cooked through.


*farmers market ingredients
**CSA ingredients

Thursday, August 27, 2015

Caramelized Onions

The interesting part of this time of year is the availability of sweet onions at every farmers market, not to mention Vidalia onions at the grocery store. Now, in general, I am not an onion person. I cannot eat raw onions at all. I try, but it just makes me sick. But if you take a sweet onion and cook it long and slow over low heat, it becomes food candy. I adore caramelized onions and am especially fond of balsamic caramelized onions.

Yedterday, I woke up at 4:30 am and couldn't get back to sleep. I needed to make some breakfast for the week so I could get back on track after our vacation. I knew I didn't have a lot in my kitchen to work with, but I did remember I had a large sweet onion. While I didn't have bacon, I did have ham, so I decided to make a modified quiche lorainne.

Ham Quiche with Balsamic Onions

1 large candy onion*
2 Tbsp Olive oil
1-2 Tbsp balsamic vinegar
6 thin slices smoked ham
6 large eggs**
1 1/2 cups milk
2 oz asiago/fontina cheese blend
Salt and pepper, go taste

Preheat oven to 350 degrees. Thinly and evenly slice the onion. Heat oil over medium heat. Add onions ND cook, stirring until the onions become translucent. Reduce heat to low and continue cooking, stirring occassionally, until onions begin to turn golden brown. Cook, stirring frequently, until desired color.at the last couple minutes, add balsamic vinegar and finish cooking. This step deglazes the pan.

Chop the ham to small pieces (about 1/4 - inch dice). Add ham to the onions an cook until heated. Take this mixture ND place in the prepared baking dish.

In a medium bowl, beat the eggs until smooth. Continue beating as you slowly add the milk. The result should be a very smooth pale yellow. Season with salt and pepper. Pour eggs mixture over onion mixture and sprinkle with cheese. Note, when using strong cheeses, you need less, otherwise, they will overwhelm the other flavors.

Bake at 350 about 40-45 minutes until top is golden brown and a knife inserted into the center comes out clean. Allow to set 5 minutes before serving. Makes 8 servings.

Note: I am in the habit of making crust less quiches. But I always regret not putting quiches like this in a crust. The savory crust is a nice contrast to the sweet onions. Consider using a crust for this recipe.

Wednesday, August 12, 2015

More Zucchini

After I thought I had processed all of my zucchini and squash this weekend, I found a few more in my shopping bag from last week's farmers market run.  So, I was looking for something different to do with them.  I ran across a recipe for zucchini cornbread.  Figured it was worth trying.  While it turned out tasty, I think I would like to find another recipe as this one was a little greasy because of the brown butter.  But it was good and if you are a brown butter type of person, I am sure you'd like it!

Zucchini Cornbread
Adapted from: http://www.bonappetit.com/recipe/zucchini-cornbread
  • 1/2 cup (1 stick) unsalted butter plus more for pan
  • 2 large eggs, lightly beaten**
  • 1/2 cup buttermilk (I made a substitute: 1/2 tsp lemon juice in milk to 1/2 cup)
  • 1 large yellow zucchini* (about 10 ounces)
  • 1 cup all-purpose flour
  • 1/2 cup almond flour
  • 1/2 cup sugar
  • 1 teaspoon baking powder
  • 3/4 teaspoon fine sea salt
  • 1/2 teaspoon baking soda
  • 3/4 cup medium-grind cornmeal

  1. Position a rack in the middle of oven and preheat to 350°. Butter a 9 x 5 x 3" loaf pan.
  2. Melt 1/2 cup butter in a small saucepan over medium-high heat. Continue cooking until butter solids at bottom of pan turn golden brown, about 3 minutes. Scrape butter into a medium bowl. Set aside and let cool. Whisk in eggs and buttermilk.
  3. Trim zucchini ends. Thinly slice five 1/8" rounds from 1 end of zucchini and reserve for garnish. Coarsely grate remaining zucchini. Add to bowl with butter mixture and stir until well blended.
  4. Sift both flours, sugar, baking powder, salt, and baking soda into a large bowl. Whisk in cornmeal. Add zucchini mixture; fold just to blend (mixture will be very thick). Transfer batter to prepared pan and smooth top. Place reserved zucchini slices atop batter down center in a single layer.
  5. Bake bread until golden and a tester inserted into center comes out clean, 55-65 minutes. Let cool in pan 10 minutes. Remove from pan; let cool completely on a wire rack. DO AHEAD Can be made 1 day ahead. Store airtight at room temperature.
 *farmers market ingredients
**CSA ingredients


Zucchini Quiche

I processed a lot of zucchini this weekend because I wanted to make at least another batch of the zucchini taco shells and freeze them to see how they hold up.  If they do well, I will stock up for the winter.  They are so yummy. 

Of course, the trouble with processing a lot of zucchini (grated), is that you often end up with extra.  I froze several 1-cup portions to use during the winter, but saved a couple portions out thinking I would do something with it this week.  While I was looking for recipes, I realized that I needed to make another quiche for this week's breakfasts.  I also had thawed a package of imitation crab and thought that would be a nice combination.  The interesting thing about this quiche is that the texture turned out similar to a frittata made with pasta.  I was really surprised.

Zucchini and Crab Quiche
  • 2 cups shredded zucchini*
  • 8 oz imitation crab, shredded
  • 1/2 cup asiago/fontina cheese, shredded
  • 6 large eggs**
  • 1 1/2 cups 1% milk
  • 1/2 cup cheddar jack
  • salt, pepper and dried basil, to taste
Preheat oven to 350 degrees.  Mix shredded zucchini, crab and asiago/fontina cheese in bottom of baking dishIn a medium bowl, whisk eggs with milk and seasonings.  Pour over the fillings and then sprinkle with cheddar jack cheese.  Bake 45 minutes or until a knife inserted into the center comes out clean.  Allow to set for 5 minutes before serving.


*farmers market ingredients
**CSA ingredients

Eggplant and Spaghetti Squash

I am getting behind on posting recipes.  This weekend, I picked up a couple small eggplant and had picked up a spaghetti squash a couple weeks ago.  While I was thinking about what to make with the eggplant, I realized it has been quite a while since I have made one of my favorite Sicilian dishes, Pasta a la Norma.  This is a spaghetti dish with a basic tomato sauce topped with fried eggplant and then finally grated ricotta salata.  The ricotta salata makes the dish rich and beautiful.  I learned about the dish from our Italian postdoctoral fellow, Alessia Meneghin, when I was in grad school.  For many reasons, I haven't really made it over the last few years. Since it is low in protein, it has to be relegated to a side dish for me now (since the gastric surgery).  Also, pasta is hard for me since the surgery.  But since I had the spaghetti squash, I decided to make it with that as a substitute for the pasta.  And since I had also picked up a bunch of Roma tomatoes at the farmers market, I decided to make a slow-roasted tomato sauce instead of my traditional stove-top sauce.  What resulted was so yummy, I can't wait to make it again!

Low-Carb "Pasta" a la Norma
Adapted from: http://www.nytimes.com/2014/10/08/dining/a-recipe-for-pasta-alla-norma-mark-bittmans-way.html?_r=0

  • 8 ripe Roma tomatoes*
  • olive oil 
  • dried basil
  • garlic powder
  • 2 small eggplant*
  • 1/4 cup olive oil
  • salt & pepper
  • medium spaghetti squash*
  • 2 oz ricotta salata, finely grated 
 Preheat oven to 275 degrees.  Prepare a large baking sheet by lining with foil.  Wash tomatoes and cut in half.  Arrange on baking sheet and drizzle (or use an oil sprayer) tomatoes with olive oil.  Sprinkle with dried basil.  Roast for 30 minutes at 275.  Stir and roast another 30 minutes.  Reduce heat to 225.  Sprinkle with garlic powder and roast at 225 for another hour.  If the tomato halves look like they are drying out, remove them from the heat. Place the tomato halves into a blender and puree.  Season as needed with salt & pepper.

While the tomatoes are roasting, cut eggplants in half.  Heat oil over medium-high heat and cook eggplant pieces until nicely browned (oil should bubble the whole time).  Remove from heat and cool.  When cool enough to handle, slice eggplant.  Set aside.

 Raise temperature in oven to 400 degrees.  Cut spaghetti squash in half and remove seeds.  Season with salt and pepper. Place cut side down onto a prepared baking sheet.  Roast for 40 minutes or until you can easily pierce with a fork.  Allow to cool until easily handled and then pull the flesh into strands with a fork.

To assemble: put spaghetti squash onto a plate.  Spoon sauce over "noodles" and then top with eggplant.  Finally, sprinkle with ricotta salata.  


*farmers market ingredients 

Sunday, August 2, 2015

Soft taco shells

One of the problems that cones with weight loss surgery is the fact that carbs, which expand after you eat them, take too much room in your stomach, making you uncomfortable and not leaving enough room for the protein you need to eat. I have found that I can substitute for pasta and rice. Spaghetti squash or spiralized vegetables make great substitutes for spaghetti. Quinoa is the best replacement for rice. But I continue to want things like tacos and manicotti. The trouble is, even corn tortillas can be a bit of trouble (although they are better than flour tortillas). As I was searching for recipes yesterday, I found a recipe for Zucchini "soft" taco shells. Since I had a couple summer squash left over, I decided to give them a try this morning. I mean, I see these recipes for cauliflower pizza crust, etc. all the time. But ricing  the cauliflower just seems like work to me. Shredding squash, on the other hand is relatively easy. Well, the turned out fabulous! I will definitely be doing this again!

Zucchini "Soft" Taco Shells

Adapted from: whiteonricecouple.com/recipes/zucchini-soft-taco-shells/

4 cups zucchini*, coarsely grated
1 large egg*
1/2 cup grated Parmesan cheese
1/4 Cup Panko bread crumbs
1/2 tsp freshly ground black pepper
1/4 tsp sea salt
1/4 tsp garlic powder
1/4 tsp ground cumin

Preheat oven to 450 degrees. Remove as much moisture from the zucchini as possible. Mix in remaining ingredients. Cover baking sheets with parchment paper. Scoop about 1/4 Cup mixture onto parchment and press into a thin circle, about 5" wide.  Repeat for remainder of mixture. Bake about 20 minutes or until shells look "crisp" and brown around the edges. After the shells have cooled, peel them from the parchment.

Saturday, August 1, 2015

Blueberries and Peaches

I love summer! I love being able to get fresh fruits and vegetables in such great combinations. Today, I had peaches and blueberries and crisp just sounded good. So here is my take on crisp with fresh pit fruit and berries!

Peach and Blueberry Crisp

4 small freestone peaches*
1 cup fresh MI blueberries*
1/4 Cup raw honey (from Bob's hives)
1/4 Cup fresh lemon juice
2 Tbsp cornstarch
1 cup old fashioned oats
1/2 cup almond flour
1 tsp cinnamon
1/4 Cup light brown sugar
1/4 Cup coconut oil, melted

Preheat the oven to 375 degrees.

Slice the peaches and combine with the blueberries, honey, lemon juice and cornstarch. Pour fruit mixture into a prepared 9-inch pie pan.

In a medium bowl, combine the oats, almond flour, brown sugar and cinnamon. Melt the coconut oil and pour over the dry ingredients. Mix until crumbly. Sprinkle oat mixture over fruit.

Bake for approximately 40 minutes. Allow to stand 10 minutes before serving. Serve with vanilla ice cream, if desired.

Zucchini and Corn

I needed a recipe for my sister's picnic tomorrow and wanted a fresh side to take advantage of the fresh produce at the farmers market. Not sure exactly how I ended up looking at recipes with zucchini and corn, but I ran across this recipe with lime to brighten the flavors. And, I found some really pretty limes at the market this morning to keep it really fresh.

A good chef always tastes their recipes, right? I did, just to make sure the flavors balanced. I love this dish! I will have to file this recipe away! It ranks right up there with ratatouille in my book.

Parmesan Zucchini and Corn
Adapted from: http://damndelicious.net/2014/07/12/parmesan-zucchini-corn/?m

2 Tbsp Olive Oil
2 cloves garlic*, minced
8 medium zucchini*
2 cups fresh corn kernels*
1/2 tsp oregano, dried
1/2 tsp basil, dried
1/4 tsp thyme, dried
Salt and pepper, to taste
Juice of 2 limes
2 Tbsp chopped fresh cilantro
2 Tbsp grated Parmesan, or to taste

Chop the zucchini. Cut kernels from cobs. In a large skillet, heat oil over medium heat. Add the garlic and cook for one minute or until fragrent. Add zucchini, corn, oregano, basil and thyme. Cook, stirring occassionally, until zucchini is tender and cooked through. Season with salt and pepper. Stir in lime juice and cilantro. Serve immediately with Parmesan cheese.

Friday, July 31, 2015

Slow-cooked Shredded Beef

This summer, I decided to get a meat CSA instead of produce. It turns out that even though I need a high protein diet because of the gastric surgery, I hate shopping for meat. And I look back and realize I always have. I don't mind cooking, I just hate shopping. This was taken care of in Cleveland with Fresh Fork Market CSA. We got everything in our shares! Meat, dairy, veggies, fruit...even things like quiche, pasta and roasted tomatoes and peppers.

My first delivery contained several roasts: two beautiful pork shoulders and two beef chuck roasts. I thawed one of the chuck roasts and was looking for barbacoa beef recipes for the slow-cooker. I can't make real barbacoa because for some reason, I haven't found a brand of canned Chipotle peppers that I can stomach. Not sure where restaurants get them because I am fine with those. I did, however find a recipe that looked interesting, so decided to give that a try.  I should mention that I think most people do not use enough cumin in their recipes, so there are some adjustments to the seasonings.

Shredded Mexican Beef
Adapted from: www.fromvalerieskitchen.com/2011/10/shredded-mexican-beef-and-a-marriage-proposal/

3 lb boneless chuck roast*
2 (4 oz) cans diced green chile peppers
2 Tbsp chili powder
1 Tbsp fresh spicy oregano (or 1 tsp dried)
2 tsp ground cumin
2 cloves garlic, minced
Salt and pepper to taste

Trim any excess fat from the edges of the roast. Place the roast on a sheet of heavy-duty foil large enough to enclose the meat. In a small bowl, combine the remaining ingredients, except salt and pepper. Mix well. Season roast on all sides with salt and pepper. Then rub with pepper mixture. Enclose meat in foil so it is sealed on all sides.

Place wrapped roast into slow-cooker. Cook on LOW for 8 to 10 hours. Remove foil and she'd meat into cooking sauce. Serve with tortillas for tacos, burritos, enchiladas, etc.

*CSA ingredients

Tuesday, July 28, 2015

Eggplant and Frittatas

I happened to catch The Chew last week when Michael Symon made his ratatouille frittata.  This morning, I was thinking that something like that sounded good because I had made ratatouille last week, so I just typed "ratatouille frittata" into the search bar and lo, and behold, up popped the actual recipe.  While his version sounds really yummy (with the addition of okra), I adjusted it to what I had available in my refrigerator.  That is the nice thing about quiches and frittatas.  They are today's pot luck.  They are both great ways to use up things in your fridge.  In my case, I had ratatouille, asiago bread and feta cheese.

Ratatouille Feta Frittata
Adapted from: http://abc.go.com/shows/the-chew/recipes/Ratatouille-Feta-Frittata-Michael-Symon
Preheat broiler to low.  Place 12 inch skillet (I used cast iron) over medium heat.  Spoon ratatouille into skillet and warm.  Cut bread into 1-inch cubes.  Add to the ratatouille and mix well.  In a medium bowl, beat eggs with milk until smooth.  Season as desired with salt & pepper.  Pour over fillings and sprinkle with feta cheese.  Cook until eggs begin to set up.  Once the eggs are 75% set, place the skillet under the broiler and broil about 8-9 minutes or until the top begins to brown.  Remove from oven and allow to set for 5 minutes before serving.


*CSA ingredients
**Farmers market ingredients

Tuesday, July 21, 2015

Dutch Baby!

I bought some MI blueberries this week.  I wait for this every year because for 20 years, I couldn't get MI blueberries when I lived in VA.  There is no comparison for flavor, so I celebrate them every year!  I also have been craving a Dutch baby pancake.  So much so, I tried to talk John into going to The Pantry this weekend.  The problem with that place is that if you don't get there before church lets out, there's a 30-60 minute wait to get in.  So we settled for The Breakfast Club (which is just as good, but they don't make Dutch Babies).  So, today, I decided to make my own!  Blueberries are great for any type of pancake, so here's the recipe.

Blueberry Dutch Baby
  • 4 eggs*
  • 1 cup milk
  • 1 scant tsp lemon zest
  • 1/2 tsp vanilla extract
  • 1/2 cup sugar
  • 1 cup flour
  • 1 1/2 cups fresh blueberries
  • 2 Tbsp butter
  • Powder sugar for dusting (optional)
Preheat the oven to 400 degrees.  Place a large cast iron skillet in the oven to warm while the oven is preheating.

In a large bowl, whisk together the milk and eggs.  Add the zest and vanilla and mix well.  Add the sugar and flour and continue whisking until well combined. Allow batter to rest while the oven preheats.

Carefully remove the skillet from the oven.  Add the 2 Tbsps of butter and swirl until the butter is melted and coats the pan.  Pour in the batter.  Then sprinkle with the blueberries.  Bake for 20 minutes, or until the pancake is puffed and the edges are brown.  Dust with powdered sugar, if desired.  Cut into slices and serve immediately.


*CSA ingredients

Saturday, July 11, 2015

New house, new appliances!

It's been a while since I have done any real cooking and that's partially because I just got tired of being so cramped in my tiny little kitchen.  Well, my big news here is that I have purchased a new house with a bigger kitchen AND replaced all the appliances with bright, shiny new appliances.  Including a beautiful, new GE gas range with convection oven.  I have not done a lot of cooking yet because I am living between two places until the end of the month.  But this morning, I decided it was time to "break in" my range. 

I had a beautiful head of broccoli from the farmers market.  So I decided that a broccoli quiche was in order.  It's amazing how much of a difference a farm-fresh head of broccoli makes.  So much tastier than anything you can get from the grocery store.  And of course, I had farm-fresh eggs as well, which everyone knows makes all the difference in the world!

Broccoli Bacon Quiche
  • 1 head broccoli*
  • 6 thin slices bacon
  • 1 cup sharp cheddar
  • 5 farm-fresh eggs*
  • 1 1/4 cups 2% milk
  • salt, pepper, garlic powder, to taste
Preheat oven to 350F.

Cut broccoli into small florets.  Place in a microwave safe bowl with 2 Tbsp water.  Cover and cook for 5 minutes on HIGH.  Drain and place in prepared baking dish.  Cook the bacon and crumble.  Sprinkle bacon and cheese over broccoli.

Beat eggs with milk and seasonings.  Pour carefully over fillings.  Bake for 35 minutes.  Remove from oven and allow to set for 5 minutes before serving.


*Farmers market ingredients.

Thursday, May 14, 2015

Ramps Quiche


Now that I’ve made a batch of Ramp Pesto, it’s time to make this year’s ramp quiche.  I bought baby spinach for the pesto, so I decided to cut up the ramp leaves and quickly sauté those with the spinach.   I also had an extra pie crust, so decided to make this quiche with a crust.  Add some chicken apple breakfast sausage and whole milk mozzarella, and you have this spring’s ramp quiche.  This quiche highlights how much I rely on other purchases to make them complete.  The pie crusts were purchased to make rhubarb custard pie.  The sausages are just something that I really like and had purchased for general use.  The mozzarella was leftover from making a homemade magherita pizza.  That is the glory of making quiche.  It’s a basic egg custard recipe that you pour over whatever vegetables/meats/cheeses you prefer.  Quick, easy, tasty!

Ramp & Sausage Quiche

  • ·         1 bunch ramps* (leaves and stems only)
  • ·         ½ bag baby spinach
  • ·         4 chicken apple breakfast sausages
  • ·         4 oz whole millk mozzarella, shredded
  • ·         1 frozen deep dish pie crust
  • ·         4 large eggs*
  • ·         1 cup 1/2% milk
  • ·         Salt & pepper, to taste

Wash and pat dry the ramp leaves and spinach.  Cut into bite-sized pieces.  Sauté over medium heat until just wilted. Place ½ in bottom of pie crust.  Slice the sausages and sprinkle over vegetables and then layer remaining vegetables.  Sprinkle with mozzarella.  In a small bowl, beat eggs with salt & pepper.  Slowly pour in milk while continuing to beat eggs.  Once completely smooth, pour egg mixture over the fillings.  Bake at 350F for 40 minutes or until knife, inserted into center, comes out clean.  Allow to set for 5 minutes before serving.


*Farmers market ingredients

Wednesday, May 13, 2015

Ramp Pesto

I ventured down to the farmers market this morning in 40-something weather.  Not my idea of great weather to be wandering around an outdoor farmers market.  However, it was WELL worth the trip!  At the second to last stand I stopped at, I found ramps!  Oh Yeah!  If you've been following me all these years, you know that I adore ramps.  And today, they put and extra bunch in my bag as I checked out.  So, I decided to make pesto with the extra batch.  I make basil pesto and garlic scape pesto every year, but I have never made it with ramps before because I generally only have enough to make whatever dish I planned.  Well, now that I've made a batch, I will probably make it every year now.  Out of the three versions, this ramp pesto is my favorite! 


Ramp Pesto
  • 1 bunch of ramps* (leaves and stems only - about 10)
  • 1 cup baby spinach
  • 1/2 cup grated parmesan cheese
  • 1/2 cup toasted walnuts
  • 1-2 Tbsp lemon juice
  • Extra virgin olive oil, as needed
Wash and dry ramps and baby spinach.  Cut ramp leaves and stems into 1-inch pieces.  Add ramps, spinach, parmesan and walnuts to food processor.  Plus until small pieces.  Switch to puree; add lemon juice and then slowly add olive oil until pesto is desired consistency.  Taste to adjust seasoning (you may add salt and pepper if you desire, or more lemon juice).  Store in the refrigerator for 3-5 days or freeze up to 30 days.  Best flavor if warmed.


*Farmers market ingredients

Saturday, April 4, 2015

Corn Tortillas and Eggs

I had made some pulled pork this week and wanted to make something different for breakfast this morning.  Since I also had some corn tortillas, I decided to make a chilaquilles casserole.  I fell in love with chilaquilles when I was in Cleveland.  We frequently received whole chickens from the CSA and I needed to find a new way to use the leftovers.  I love corn tortillas and they are so much easier on my stomach, so I tend to have them in my fridge.  Finding different ways to enjoy them is something I try to do every once in a while.

Since this was a first try, I kept it pretty simple.  I think I would use a sharper cheese (I have a beautiful aged gouda in the fridge that I should have shredded or I should have used my extra sharp cheddar).  It's not bad, but the cheese is more a supporting player than star in this recipe.  Not that it's bad, I just like to be able to taste all the flavors.  I also might consider adding some black beans and cook the pork southwest style instead of bbq.  But then it would be a completely different recipe, right?  That is why I love egg casseroles.  They are so versatile.

Pulled Pork Chilaquilles Casserole
  • 6 corn tortillas
  • 2 cups pulled pork (whatever your favorite recipe is)
  • 1 1/2 cups sharp cheddar
  • 5 large eggs
  • 1 1/4 cups 1% milk
  • salt and pepper, to taste
Preheat oven to 350F.  Cut tortillas into 1 inch strips.  Layer half of the strips in a prepared casserole.  Layer on half of the pork and cheddar.  Repeat layers.  Beat eggs with salt & pepper until smooth.  Beat in milk and continue beating until completely smooth.  Carefully pour eggs over fillings.  Bake for 35 minutes or until knife inserted into center comes out clean.  Allow to set for 5 minutes before serving.


Saturday, March 7, 2015

Chicken Andouille Jambalaya

Yesterday we went to Sam's Club to pick up some items for John.  While there, I decided to get a chicken.  Of course, since I also recently got a big bag of quinoa, I figured today would be a good day for jambalaya.  So, when I went out to run errands today, I stopped at Eastman Party store and picked up a package of Adell's Cajun Andouille sausages.  I love doing this because it gives me a chance to use of some of the vegetables I put up in the freezer.  Today it was red peppers, corn and peas.  The combination turned out especially nice.  The only thing that might have been better was a bit of okra.  As always, the combination of Rotel and andouille sausage give this dish quite a nice bite!  The quinoa works so nicely for me, it allows me to have a "normal-sized" serving.

Chicken Andouille Jambalaya
  • 2 cups white quinoa
  • 4 cups vegetable stock
  • 2 (10.5 oz) cans Rotel tomatoes with chilis
  • 2 cups diced red peppers
  • 2 cups fresh sweet corn*
  • 2 cups fresh sweet peas*
  • 4 cups shredded rotisserie chicken
  • 4 Adell's Cajun Andouille sausage links
Place all ingredients into crock of slow-cooker, placing the chicken and sausage on top.  Cover and cook on HIGH for 4-6 hours or until the quinoa is cooked and most of the liquid is absorbed.  Remove sausages, slice into 1/4" pieces and return them to the crock: Mix well.


*CSA ingredients

Sunday, January 11, 2015

White Chicken Chili

It must be winter. I was trying to decide what to make for lunch. Looking at my fridge, I realized I still had a lot of chicken leftover. Since the Cowboys/ Green Bay game was on early this afternoon, I decided something football appropriate would be good. I've never made white chicken chili before, but I thought it sounded good. Of course, I only had 2 cans of Cannellini beans, so I had to use pintos for the third, but I threw everything in the Crockpot and crossed my fingers. Of course, my corn craving was still hanging around, so after polling on FB, I added that. Then I couldn't get the seasoning right. So, back to FB and in the end, I finally got it worked out. I really like this stuff and now I know how to make it.

 White Chicken Chili
  •  1 medium onion, diced
  •  3 cloves garlic, minced
  •  1 Tbsp extra virgin olive oil
  • 2 cans Cannellini beans, drained and rinsed
  •  1 can pinto beans, drained and rinsed
  •  4 caps shredded chicken
  •  2 (4-oz) cans green chilies
  •  2 Tbsp ground cumin
  •  1 tsp oregano
  •  1/4 tsp cayenne
  •  2 tsp smoked paprika
  •  salt & pepper, to taste
  • Sharp cheddar, for garnish
Heat olive oil in large skillet.  Cook onions and garlic until onion is translucent.  Add to Crockpot.  Add remaining ingredients, except cheese.   Cover and cook on HIGH for 3-4 hours. Adjust seasoning.  Serve topped with cheddar, if desired.